Showing posts with label preparation. Show all posts

Tuesday, September 27, 2011

Getting material curated at UCMP

On my last visit to UCMP, I spent an hour with a student volunteer and my good friend Ash Poust placing some material I had donated last year into specimen trays. These are all specimens collected from a locality in the Purisima Formation I studied as an undergraduate student. Most of this material was collected in 2005 and 2006, and I slowly curated and prepared it during my undergraduate career (and during grad school). I've now gotten about 1/2 of this collection to UCMP, and already it fills a drawer and a half.
Which is bad (and good). It's bad because the entire collection from this locality will take up half a cabinet by itself, not including the large oversize material. What's worse is that this material is roughly 1/3 of my entire collection - I have material I've collected from other Purisima localities, as well as the Santa Margarita Sandstone. All in all, my collection will probably require two-three cabinets at UCMP. Keep in mind I've already donated about 1/10 of my collection to the Santa Cruz Museum of Natural History.

Shark teeth and bird bones from the Purisima Formation.

That being said, it was a very satisfying experience to see all this material finally looking like it was part of a museum collection. I'm more motivated than ever to get the rest of it curated (and out of my house!). Now that I'm writing up the marine mammal assemblage from this locality, I can finally get rid of it all and get it into a proper museum setting.

Sunday, July 31, 2011

Preparing an auk bone from the Purisima Formation, part 2

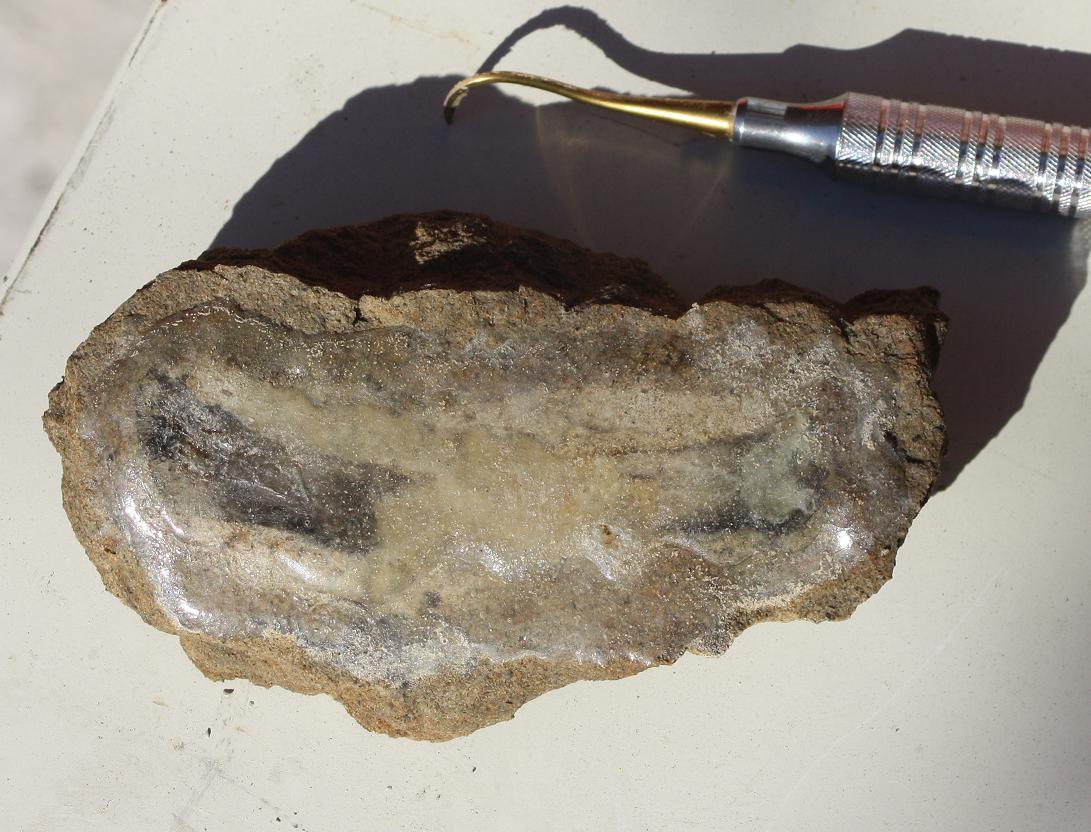
In order to properly prepare this bird bone (see previous post) , I decided to pour two part epoxy onto the eroded surface of the bone. In the field, I carved a block out of the rock with the bird bone in it, and wrapped it in tin foil. Weeks later, I unwrapped it and began the preparation process.

Beginning steps of preparation. A - the collected block prior to preparation. B - supplies needed. C - application of vinac using a paintbrush. D - application of thin superglue to stabilize parts of the bone.

First off, the bone had to be stabilized. Vinac and Butvar are two acetone-based consolidant glues which are very thin (i.e. have a low viscosity) and soak into porous bone well. In this case, I was not satisfied with vinac alone, so I began by dripping superglue into the most poorly preserved parts of the bone; superglue is also thin enough for this task, although it is substantially more difficult to reverse if you screw something up. I followed this by a liberal application of vinac onto the bone. I also painted vinac onto the sandstone where I would later pour epoxy. I did not want the outermost layer of the sandstone to flake off of the cured epoxy and take the bone with it, or alternatively, have only part of the bone stick onto the epoxy plate and the rest fragment off.


Epoxy application onto the fossil. A - a rolled up cylinder of paper serves as a convenient and cheap tool to drip epoxy with (as opposed to popsicle sticks or tongue depressors). B and C - the rolled up paper tube is used to drip epoxy. D - the epoxy sheet is allowed to cure overnight.


Part two of the preparation process was to apply a generous layer of epoxy, once the vinac had cured. Two part epoxy comes in paired tubes, and has to be mixed - I usually just mix it onto a piece of scratch paper. I tear off one side, and roll it up to use as a "honey dripper" (you know, like the thing you see in honey nut cheerios commercials and cereal boxes) to collect and drip epoxy from. It is imperative to try and mix it 1-1 - it can be difficult, because sometimes pushing on the plunger results in one tube being pushed more than the other, and you get something more like 1.3-1, which will take longer to cure and may not cure ever, which is a really bad problem if you're working on an important specimen. Don't screw that up. Sometimes, there is also more of a bubble in one tube, making one of the component parts come out more than the other; you can mitigate this by pushing back on the sides of the plunger, making the other tube extrude more epoxy (maybe I should do a post on beginner epoxy tips).

A second coat of epoxy was applied along the bone in order to strengthen it, and
was allowed several days to cure.
Once it was cured, the soft sandstone matrix was wetted for easy removal, and the block was picked away and carved down to size.

The initial coat came out sort of thin in places, which I thought would be too flimsy. I decided to mix some more epoxy and add a second, thicker coat right up along the bone. The first coat was still sticky to touch even after 24 hours, so after I added this second coat, I allowed it to cure for about four or five days while my fiance and I went on vacation. When we returned, I soaked the sandstone block in warm water and allowed the sandstone to become saturated; Purisima Formation sediment is much easier to prepare and separates from bone much more easily when wet - I estimate it makes preparation take 2/3 to 1/2 less time than it would if the sandstone were dry. The block was carved down to a size roughly equal with the epoxy plate.

Preparation of the sandstone off of the bone and epoxy plate. A - one centimeter of sandstone left. B - a small bit of the ventral tubercle (a small dark spot of bone down and to the left of the 'B') is exposed. C - it doesn't take more than another ten minutes to expose nearly the entire proximal end of the bone. D - after some more work with a dental pick and a wet toothbrush, the preparation is finished. E - the finished product, after vinac application.

The above picture shows the progress of preparation. The final product shows the important bits of the cranial/anterior surface of the bone. Additionally, where the middle of the shaft had broken away it left a slight mold that more or less shows the shape and curvature of the shaft - the epoxy filled in this as a small cast, and the original shape of the bone can be seen. The only unfortunate thing about this is that the mancalline "scar" that allows identification of various species is not really accessible - it is probably preserved, and the pneumatic foramen is filled in with sediment; preparation of this would require removal of some of the epoxy around the ventral tubercle. It does, however, preserve a slight muscle attachment crest on the bicipital crest, which suggests this specimen may belong to Mancalla lucasi as well. Either way, this specimen indicates that this part of the Purisima is Pliocene in age.

Saturday, July 30, 2011

Preparing an auk bone from the Purisima Formation, part 1

I know I had promised another post on pelagornithids (and sooner than this), but I just finished a preparation project on a small bird bone, and I think it is too cool not to share the method I used for this. Dick Hilton and I were recently doing some fieldwork together in the Purisima Formation, and I jumped up on a ledge and found a bird humerus exposed in a horizontal exposure.Dick Hilton near a new baleen whale find in the Purisima Formation.
The new bird bone, not entirely unsalvageable.

As soon as I saw it, I thought it was unfortunate that so much was missing; nearly the entire caudal/posterior face was missing, and eroded parallel to the long axis of the bone. Additionally, the middle of the bone was completely gone; enough of each end were missing that it would be very difficult to collect each end separately and not have them fragment into a million pieces during preparation. Bird bones are not exactly rare in the Purisima Formation, but since the length of bird bones has historically been used as a taxonomic tool along with other morphologic features, I thought it better to excavate it as a block - and to be honest, nearly the moment I saw it, the gears were already turning and quickly formulated a preparation solution.

The new fossil specimen compared with a more complete humerus of Mancalla lucasi (formerly Mancalla diegensis). The cross-hatched area indicates what was missing of the new specimen.

Additionally, the curvature of the shaft and the distinctive proximal end (even in cross section) made the bone very easy to identify - it is transversely flattened and curved, which identifies it as the flightless auk Mancalla; this bird happens to be the most common bird taxon in the Purisima Formation - auks and puffins (Alcidae) happen to be relatively common in general. In a forthcoming paper, I describe a fossil humerus identifiable as the species Mancalla diegensis; in a recent paper on mancalline auks, my colleague (and coauthor on the Pelagornis article) Adam Smith sunk Mancalla diegensis and erected a new taxon, Mancalla lucasi (I have another post lined up summarizing mancallines and Smith's new monograph). This specimen is very similar to Mancalla diegensis in terms of size, but could just as easily belong to Mancalla cedrosensis, Mancalla calforniensis, or Mancalla vegrandis.

I thought an easy way to deal with this specimen would be to liberally apply a large sheet of two-part epoxy onto the exposed broken surface of the bone and sediment, and prepare it down from the other side. This I hoped would result in a sheet of plastic with the caudal surface of the bone exposed on the other side. The next post will describe the preparation process, and hopefully give you ideas on how to tackle similar problems when dealing with fragmentary fossils.

Saturday, March 26, 2011

Fossil Fur seals from Northern California, part 1: discovery

Earlier this week saw the publication of my third article, concerning fossil fur seals of the genus Callorhinus from the Pliocene and Pleistocene of Humboldt County in Northern California. This paper has been in the works since 2006; I presented a poster on this topic at SVP in 2007. I did some of the initial research in 2006 and 2007, and after my SVP poster, I tried a couple more drafts of the manuscript - but it, along with a couple of other projects, fell by the wayside until I started graduate school. It wasn't until I had the herpetocetine jaw paper off my plate that I returned to this project, and in may of last year I submitted my completed MS to the Journal of Vertebrate Paleontology after three years of intermittent research.

The first page of Boessenecker (2011)

The story really starts in 2004. My buddy Ron Bushell, who helped me identify many of my fossils when I was still in High School, was collecting at a fossil site in Humboldt County, California. At this particular locality, he was looking for large concretions from the Rio Dell Formation which occasionally bear beautiful scallops (Patinopecten) the size of dinner plates, and incredible 6-10" long gastropods.

Ron and his collecting partners walked down the riverbank looking for nodules bearing mollusks, and thought he had hit the jackpot when he found a large nodule, about 2 feet in diameter, just sitting there in the gravel bar. Now, Ron is an experienced nodule collector - he's spent a lot of time collecting nodules with mollusks from the Pliocene and Pleistocene of Humboldt County, and Eocene crabs from Oregon and Washington.

So, if you're a nodule collector, naturally you take out a sledge hammer and attempt to destroy the concretion. Many concretions have nothing in them, and it is better to crack them in the field rather than lug them home and find out later (at some crab localities, Ron knows well enough which concretions will have crabs, and which ones won't, and packs them all out, and cracks them in his garage). Well, he broke this concretion open, and instead of white shells being exposed, familiar (but much rarer) brown fragments flew out onto the river bank - he immediately knew that he had found bone.

Initial preparation of the Bushell specimen.

Normally, Ron would keep any vertebrate fossils from this locality, due to their rarity. However, he also noticed a tooth fragment - and he knew he had found something pretty important. So, just like any crab or mollusk fossil, he collected all the pieces, took them home, and glued them all together in his garage, and begun airscribing the fossil.

Continued preparation of the Bushell specimen.

As it turned out, Ron had found two associated lower jaws (left and right) of a small fur seal, preserved beautifully in relief in a large concretion. He posted these photos on the old "Collecting fossils in California" forum, and I was very interested once I saw it. After a few emails, he offered to let me study the specimen - an opportunity I was most excited for.

Finished preparation of the Bushell specimen.


The Bushell specimen as it was when I first saw it.

The following summer, my fiancee (then girlfriend) and I drove out to California for the summer, but took a detour through Oregon and Humboldt County in order to visit Ron and pick up this beautiful specimen. Thanks to Ron's generosity, this fossil was made available to study - and now (finally, five years later) Ron's wish that it be studied finally culminated in my paper in the Journal of Vertebrate Paleontology.

Next up - introduction to the "Gilmore Fur Seal", Callorhinus gilmorei.

Boessenecker, R.W. 2011. New records of the fur seal Callorhinus (Carnivora: Otariidae) from the Plio-Pleistocene Rio Dell Formation of Northern California and comments on otariid dental evolution. Journal of Vertebrate Paleontology 31:2:454-467

Thursday, April 15, 2010

Prep update: Purisima Formation mysticete skull 3

Here are some pictures of the balaenopterid skull after preparation was completed. I finished preparation the tuesday before spring break. On wednesday and thursday I made the cradles, and friday loaded it into my car to drive back to California (on saturday).


Oblique posterolateral view of the Purisima balaenopterid skull.
Ventral view of the Purisima balaenopterid skull.Lateral view of the Purisima balaenopterid skull.The skull with the completed ventral cradle.The skull with both ventral and dorsal cradles.

On Friday of Spring Break, I met UCMP Curator Mark Goodwin at the oversize storage facility to drop the specimen off. UCMP is getting a new storage facility which will be a vast improvement over the current warehouse at the Clark Kerr campus (conveniently located right on the Hayward Fault).

Tuesday, April 6, 2010

Prep update: Purisima Formation mysticete skull 2

Hey folks,

As I mentioned in a previous post, I've been preparing a fossil mysticete skull I collected from the Purisima Formation in 2005 for a long time (i.e. 4.5 years). This winter and spring I really stepped up preparation, and you can see in these photos what the specimen looked like in January. At this point, Tom Demere of the San Diego Natural History Museum, who specializes in fossil mysticetes, tentatively identified this specimen as belonging to "Balaenoptera" cortesii var. portisi, a medium sized balaenopterid from the Pliocene of Italy, Florida, and California (Demere et al. 2005). An undescribed cranium (UCMP) from the San Diego Formation and several crania I've seen in the Purisima Formation have this same morphology, but I did not realize this taxon was B. cortesii var. portisi, or that this specimen belonged in that taxon. "Balaenoptera" cortesii var. portisi is characterized by elongate, widely diverging zygomatic processes, which these other fossils have; it appears that the zygomatics of this specimen are damaged. It is also a taxon that needs a new genus, as it definitely has features that place it outside of Balaenoptera. Tom Demere and Michelangelo Bisconti are currently revising this taxon (Demere et al., 2005).

The new Purisima mysticete skull in posterolateral view.

The new Purisima mysticete skull in anterolateral view.

The new Purisima mysticete skull in dorsal view. note the wide, triangular supraoccipital shield, a typical feature of balaenopterids.
The new Purisima mysticete skull in anterodorsal view.

Anyway, quite a bit of matrix was left at this point. Soon, I'll post pictures of the specimen after preparation is completed.

Deméré, T.A., A. Berta, and M.R. McGowen. 2005.
The taxonomic and evolutionary history of fossil and modern balaenopteroid mysticetes. Journal of Mammalian Evolution 12:99-143.

Monday, December 14, 2009

Partial mysticete jaw (more fossil preparation)

About two years ago I came across a partial lower jaw of a small baleen whale in a cliff. The outwardly bowed part of the jaw was facing the outside of the cliff, and the middle had eroded away, leaving the anterior and posterior ends. I immediately collected the posterior end, which was (and currently still is) in a small nodule, and awaits further preparation. However, what is preserved indicates it belongs to Herpetocetus - my favorite cetacean. The posterior mandible of Herpetocetus is very distinctive; the three main features of this part of the jaw (the coronoid process, mandibular condyle, and angular process) are all anteroposteriorly elongate relative to other mysticetes, with the angular process projecting posteriorly as a flat flange. Anyway, as the specimen isn't prepared yet, I'm not going to show you pictures of the interesting part.

After I collected the posterior part, I tried to excavate the anterior portion; I successfully removed two segments which broke along natural cracks, and a third portion (which I figured at the time was the anterior tip) which was stuck in a nodule, and was rather stubborn. I decided to leave that part in the cliff, and return later under more favorable conditions. The next few visits it remained, and I checked up on it; I figured noone else would disturb it (or even spot it). Well, I got lazy, and over thanksgiving, I returned with the intention of collecting it, and some fresh pick marks were around it, and whoever it was had chipped away a little bit of bone, much to my chagrin. Anyway, I excavated the rest of it immediately; fortuitously the other person had started a trench around the concretion, so it took a mere 5 minutes to carve around it and pop it out - and it did make a 'pop' sound and land with a resounding thud on the beach sand, to which I said to myself "if I had known it would have been that friggin easy, I woulda done it two years ago!".The anterior dentary before and after chiseling.
The problem was, I had no idea whether or not the two pieces would even connect, given the damage done by the other collector, and two years of erosion. And I had to fly with the fossil in my duffel bag all the way back here to Montana to find out. I "gingerly" chipped away some pieces of the concretion with a rock hammer and chisel, which split the rock from the bone perfectly.

The anterior 1/3 of the Herpetocetus mandible.

Then, when I got back to Bozeman, I took the fossil to campus and nervously matched up the two sides - a lot of bone was definitely missing, but (thank god) the two pieces matched up along the ventral side of the bone, preserving the natural length (which is kind of moot anyway, given that I'm missing the middle - kind of, because I measured the missing distance when I was in the field). Some major acid preparation is in order, as well as some serios airscribing and microblasting on all three pieces. These specimens are very similar to mandibles of Piscobalaena, a cetotheriid from the Pliocene of Peru, and the probable sister taxon to Herpetocetus (Bouetel and Muizon, 2006). To be totally honest, the piece of the mandible I've shown you looks pretty damn similar across much of Chaomysticeti (baleen bearing mysticetes), with the possible exception of balaenids.


The mandible of Piscobalaena nana from the Early Pliocene of Peru (from Bouetel and Muizon, 2006)

This is one of five partial Herpetocetus dentaries I've collected from the Purisima Formation (none are currently in museum collections at UCMP or SCMNH), and is the second most complete specimen; one is a complete, ~4' long, very large and robust dentary, and the others are all posterior dentaries (i.e. posterior 1/3). Two of these are extremely small (i.e. one is a fragment where the shaft of the dentary was only 2.5cm high), and likely represent neonates or extremely young individuals. These specimens, along with a nearly complete skull, a partial skull, half a dozen petrosals, and several tympanics will be the subject of a study by Jonathan Geisler and myself. In addition, there are two more possible (one definite) Herpetocetus crania in-situ, which will (hopefully) be excavated over winter break.

For more information on cetotheriids, see Alton Dooley's recent post on cetotheriids at Updates from the Vertebrate Paleontology Lab.

Bouetel, V., and C. de Muizon. 2006. The anatomy and relationships of Piscobalaena nana (Cetacea, Mysticeti) a Cetotheriidae s.s. from the early Pliocene of Peru. Geodiversitas 28:319-395.

Sunday, December 6, 2009

Fossil preparation - odontocete tympanic

About two or three summers ago I collected a beautiful little odontocete tympanic from the Purisima. Problem was, I only found out it was beautiful (past tense) after it sat in about twenty or thirty pieces. Because the part that was exposed looked like some other type of bone (and not an odontocete tympanic) I mis-estimated how sturdy the fossil was, and it exploded as I carved matrix away from it. I have since not repeated the mistake. Anyway, the fossil has sat in pieces in a plastic bag for two years, and I finally got the courage to glue it back together. I say courage because 1) I was somewhat embarassed by this damage, and 2) I was nervous to piece together all these tiny fragments. Below is a photo of what I had to work with.
Tympanic fragments prior to preparation.

I began by finding the pieces of the robust involucrum, which is the thick portion of the cetacean tympanic. There are more or less three major portions of the tympanic: the involucrum (frequently the only preserved part), the posterior process, which attaches to the posterior involucrum, and the paper-thin involucrum (which in odontocetes is usually under 1-1.5mm thick, hence the overall fragility of these elements). Then, I started finding matching pieces, and gluing these to the involucrum.

The tympanic after 30 minutes of preparation; some of the outer lip fragments have been glued in place. Lateral view (top photo) and anterior view (bottom photo) - note the matrix-free tympanic cavity.

After a couple more hours, I was able to finish gluing back most of the outer lip of the tympanic, as well as the posterior process.

Tympanic before (left) and after (right) addition of the sigmoid and posterior process.

Tympanic in dorsal (left) and lateral (right) aspects.

After the fossil was glued together, it became very obvious that this was a tympanic from the "river dolphin" Parapontoporia wilsoni, which has a small posterior process, a sharp anterior apex of the bulla, and most characteristically a laterally inflated outer lip, not seen in any other Purisima odontocete (for which tympanics are known, and out of the given tympanic sample from the Purisima Fm.). As far as crania, jaws, periotics, tympanics, and parts thereof go, Parapontoporia is by far the most common Purisima odontocete (i.e. between collections at UCMP, SCMNH, and LACM go, there are roughly a dozen nearly complete crania known, rostrum not included).

Newly prepared tympanic (right) side by side with another very well preserved Parapontoporia wilsoni tympanic.

All in all, I was extremely pleased; in one afternoon I had turned a pile of fragments (which I had virtually no hope for) into a beautiful little specimen. All but three tiny fragments under 5mm in size were glued on; the other ones probably attached to the margin of the outer lip, which may require fragments lost during collection (or, conversely, pieces pulverized). But let's not split hairs here - this by far was the most damage I've ever done to an odontocete tympanic, to the point where I was embarassed to even think about it; and now, it's one of the nicest I have. The positive side to this inadvertently destructive mode of
collection was that all the matrix was absent from the tympanic cavity, unlike the specimen on the left in the above photo (where the matrix inside was actually phosphatized, but phosphatic 'cementation' had fortuitously not formed an overgrowth around the rest of the bulla - best case scenario!). This is one of about a dozen and a half or so odontocete bullae I've recovered from the Purisima.

Monday, October 5, 2009

Summer Adventures Part 5: new Herpetocetus cranium

Hey gang, I've finally returned from SVP and London, and finally beaten (nearly) this bad cold I've had (several of my office mates keep insinuating that I got swine flu; some other MSU students did - I was not so unlucky). So, in keeping with the attitude of my most recent posts, I will continue on with my summer adventures.

Earlier this summer I made a quiz type post, and never bothered following up on it (except in the comments). Well... for those of you too lazy to figure out what it was, now I'll show you.
I've shown the dorsal surface of the unprepared fossil adjacent to a photo of the well preserved cranium of Herpetocetus bramblei that I presented on at SVP in 200, with certain features lettered. A=zygomatic process of the squamosal; B= vertex; C = occipital condyles; D = exoccipital 'crest'. Herpetocetus, while exhibiting some decidedly 'primitive' features (primitive isn't politically correct, but given the nature of the cetacean cranium, its really convenient, and since this isn't peer reviewed, I don't care about 'PC'), also has a radically telescoped cranium. The radical telescoping isn't very obvious from the posterior cranium, though, and instead the primitive features are more salient. These include the extremely narrow and triangular supraoccipital shield, and the very anteriorly oriented zygomatic processes. Not terribly obvious from this specimen (because they are worn off), but very obvious on the H. bramblei cranium I have are vertically oriented, very well developed lambdoidal crests; these are typically laterally oriented in mysticetes, overhanging the temporal fossa. Now I'm just yapping; maybe I should really focus my chi into writing up that description...

In any event, the new fossil as exposed shows several diagnostic features of Herpetocetus (outlined above[ish]), and some features (such as the narrow supraoccipital) that are unique as far as Pliocene (and latest Miocene) mysticetes go. This last photo shows the slab (very, ver, very) slowly dissolving away in an acetic acid bath. I let it go while I was gone at SVP... and it didn't look any different when I got back. Acetic acid doesn't really degrade Purisima Formation nodules; it pretty much just softens them up to make airchisel prepping easier.

Stay tuned, folks - I still have tales to tell of fieldwork with Dick Hilton in Oregon, shark teeth lodged in sea otter skulls, and some other less interesting stuff I can't seem to remember at the moment.

Oh, and I got to be the 6,000th visitor to this blog - I rule.

Tuesday, June 23, 2009

Acid preparation, Part 2

I'm trying the delayed posting utility, so we'll see how this works when I'm done with my road trip.

Here are some more photos of the acid preparation experiment I tried last month. I shouldn't say 'tried' - because this succeeded beautifully. The jaw took about 8 days of acid bathing to completely remove all of the nodule. It did take about 3 gallons of vinegar (3.2 or 3.5 % Acetic Acid, if I remember correctly), which made for a grand total of $6 - definitely worth it, especially considering that there aren't any tool marks now, and I didn't really have to lift a finger. All this took was checking it daily, and replacing the vinegar after each 'batch' had been used up, so to speak (can you tell I didn't do well in chemistry?).
Photo of the specimen after 140 hours of acid preparation.

In any event, I am extremely happy because many fossils from this locality occur in nodules, and they are all of this same sediment with calcitic cement. I'll be at this locality in three days, so hopefully this time I'll find a skull or something else really neat.


Photo of the finished specimen after 200 hours (8 days) of acid preparation.

Tuesday, May 5, 2009

Acid preparation, Part 1

Over spring break a friend of mine (Ash Poust) found a nearly complete sea lion jaw in a concretion. This was over a spring break road trip, during some reconnaissance fieldwork in coastal Oregon. Below is a photo of the specimen as found.
Photo of the specimen before acid preparation.

Over the last couple years, I've been experimenting with acetic acid for acid preparation. In the case of nodules from the Purisima Formation (material I usually am preparing), acetic acid merely softens the concretion to ease mechanical preparation. Nodules in the Purisima Formation are typically sandstone with calcium carbonate cement (i.e. the nodule is more or less a zone of calcium carbonate cemented sandstone that preferentially weathers out). This specimen appeared to be in a carbonate nodule as well. I figured before I started mechanical preparation of this jaw, I should at least stick it in an acid bath for a couple days. So I left it in a tub over night, and was amazed at what I saw the next morning.

Photo of the specimen after 20 hours of acid preparation.

That may not seem like a lot at first, but if you look closely it is obvious that there is about a 1/2 centimeter of the nodule missing. Unlike specimens from the Purisima Formation, the sand from this nodule simply fell away as the cement dissolved. Purisima nodules tend to stay together during acid prep; a few grains will be shed, but the acid just seems to weaken the outer centimeter of the nodule.


Photo of the specimen after 45 hours of acid preparation.

As of right now, approximately 1/2 of the entire nodule has been dissolved away, and it has used up 2/3 of a gallon of acetic acid (i.e. regular vinegar; costs me about 3$ a gallon). Thus, it looks like I may not really have to lift a finger to get this completely prepared - all I have to do is switch out the vinegar each day (once it stops fizzing), spend another three bucks (I doubt it will require more than another gallon to finish the job) and wait. Which is a good thing, because I have a take-home final exam to finish.